Welcome, readers! In today’s MySQL tutorial, we will explore remote database administration using SQLyog MySQL GUI tool. While PHPMyAdmin through cPanel is a commonly used method for managing MySQL databases, there may be instances where cPanel access is not available, but you have FTP and MySQL login details. In such cases, how can you connect to the database without accessing cPanel? Let’s find out!
Connecting to a remote MySQL database without cPanel is a straightforward process. I will demonstrate how to achieve this on a Windows operating system, specifically Windows 8.1. To accomplish this, we will use a MySQL GUI tool called SQLyog. SQLyog is a powerful tool that simplifies database management and offers a range of features.
To get started, you can visit the SQLyog download page to obtain the software. Please note that SQLyog may require a purchase, but it is worth the investment. Although there are free MySQL GUI tools available, after trying several options, SQLyog stood out to me as an excellent choice. I have been using it extensively for various projects, and it has consistently delivered outstanding performance and functionality.
Please note that, there is a free community version of SQLyog with limited features which can be an excellent choice too.
By utilizing SQLyog, you can establish a connection with your remote MySQL database without the need for cPanel access. It provides a user-friendly interface that allows you to manage your database efficiently, even in situations where cPanel is not accessible. Now, let’s dive into the process of connecting to a remote MySQL database using SQLyog and explore its incredible capabilities for remote database administration.
Stay tuned as we proceed with the next steps and unleash the full potential of SQLyog in managing your remote MySQL databases.
Steps to connect to remote MySQL database using SQLyog
Step 1: Upload SQLyogTunnel.php.
To begin, locate the file “SQLyogTunnel.php” on your local machine. You can typically find it in the directory “C:\Program Files\SQLyog”. Once you have found the file, it needs to be uploaded to your server’s root directory or any folder where you can access it via a URL.
For instance, let’s say you upload the file to the root directory of your website, which is “http://example.com”. In this case, the URL to access the file will be “http://example.com/SQLyogTunnel.php”. Make sure to take note of this URL as you will need it in the following steps.
Uploading the SQLyogTunnel.php file enables the necessary functionality for establishing a secure connection between SQLyog and your remote MySQL database. This step is crucial to ensure a smooth and secure connection setup.
With the file successfully uploaded, let’s move on to the next step, where we will configure SQLyog to connect to your remote MySQL database.
Step 2: Create connection
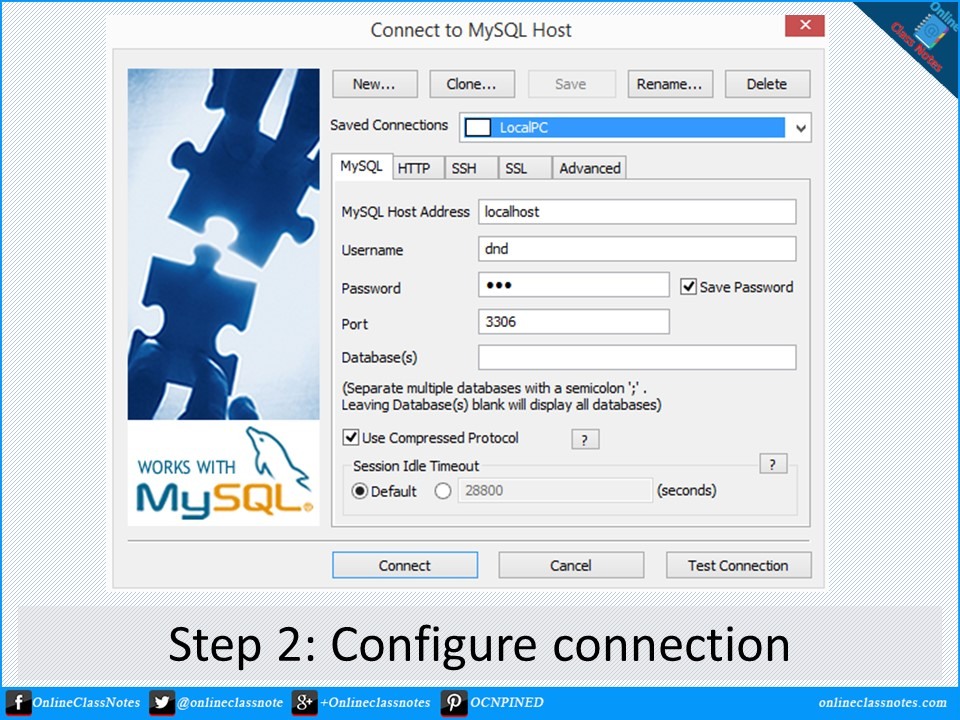
To proceed, open or run SQLyog MySQL GUI tools. The SQLyog interface will appear, providing you with a range of options for database management.
In the event that the SQLyog interface does not automatically appear, you can manually open it by navigating to “File” and selecting “New Connection” or by using the keyboard shortcut Ctrl+M.
If you have previously saved connection settings in SQLyog, you can click the “New…” button at the top of the interface and give this new connection a name for easy reference.
Next, under the “MySQL” tab, you need to enter your MySQL Host Address, MySQL Username, and MySQL Password in the corresponding fields on the form. This information is crucial for establishing a connection with your remote MySQL database. Ensure that you accurately input the details to avoid any connection issues.
Step 3: Open HTTP tunneling
We are now ready to proceed to the next step, where we will configure the HTTP tunneling settings and finalize the connection setup in SQLyog.
Click on the “HTTP” tab, and a form will appear, presenting you with additional configuration options. This form allows you to specify settings related to the HTTP tunneling feature, which enables secure communication between SQLyog and your remote MySQL database.
By configuring the HTTP tab, you can establish a secure connection and ensure that your data remains protected during the database administration process.
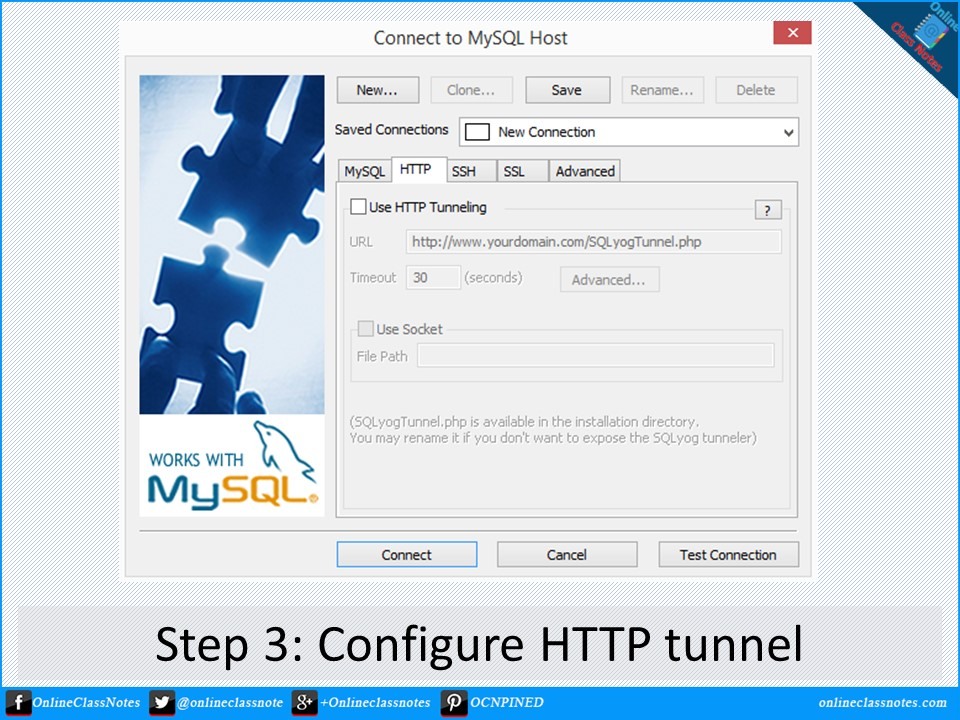
In the SQLyog interface, locate the “Use HTTP Tunneling” checkbox and select it. Once selected, you will notice that the previously disabled “URL” text field becomes enabled and ready for input.
In the “URL” text field, enter the URL that you obtained in Step 1, which points to the location of the SQLyogTunnel.php file. This URL is crucial for establishing the HTTP tunneling connection between SQLyog and your remote MySQL database. Double-check the accuracy of the URL to ensure a successful connection.
After entering the URL, you are ready to establish the connection. Simply click on the “Connect” button, and SQLyog will initiate the connection process using the specified settings. Once the connection is established, you will be able to access and manage your remote MySQL database through SQLyog.
Step 4 (optional): Save the connection
For your convenience, you have the option to save this connection record. Click on the “Save” button at the top of the interface to save the connection settings. By doing so, you won’t have to repeat the setup process each time you want to connect to the remote database. This feature allows for quick and easy access to your database in future sessions.
Now, you’re all set to work with your remote MySQL database using SQLyog. Enjoy the enhanced functionality and user-friendly interface provided by SQLyog for efficient remote database administration.
Feel free to explore the various features and capabilities of SQLyog to maximize your productivity and streamline your database management tasks.
Read Next: Take backup of all databases at once using SQLyog